
Above is a Spreadsheet
Spreadsheets are powerful tools for organizing and analyzing data. Whether you are managing any types of data like finances, shopping, health, fitness, addresses, event planning, travel plans, etc., learning how to use Excel or Google Sheets is a valuable skill. I will guide you on how to create and save your first spreadsheet on both the platforms.
Before going to tell you how to create and save your first spreadsh, lets first understand what a spreadsheet is. A spreadsheet is like a digital notebook with lots of tiny boxes. These boxes are called cells, and cells can hold numbers, words, or anything you type. It is a smart tool on your computer that helps you to organized and manage your information easily.
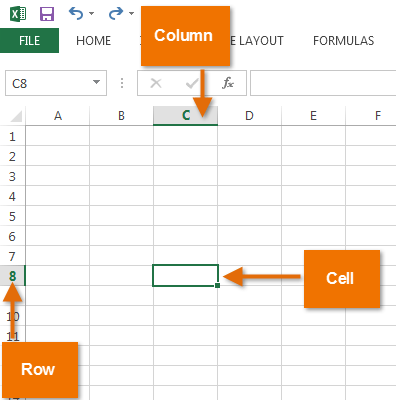
Cell in a Spreadsheet
What is meant by a digital notebook. A digital notebook is like a regular notebook, but instead of using paper and pen to write something, it is on your computer. You can write, organize, and store information digitally.
Creating a Spreadsheet in Excel
There are many ways to open Excel. Here are some simple methods you can follow-
Method 1: Using the Start Menu
- Click on the Start Menu and type Excel. (Or press Windows Key, type Excel, and hit Enter)
- Click on the Excel app from the search results. It will open Excel.
Method 2: Using the Run Dialog Box
- Press Windows + R to open the Run dialog box. (Run dialog box lets you quickly open programs or files from your computer.)
- Type excel and hit Enter. This will open Excel.
Note: When you open Excel for the first time. it will prompt you to select a file. Choose Blank
Workbook to start a new spreadsheet.
Enter Data
To start entering data in Excel, follow these steps-
- Click on any cell (a small box in the grid of your workbook).
- Type your data, such as numbers, text, or anything you want.
- Press Enter to submit your input and move to the next cell.
- You can click another cell and enter different data. Take some time to practice this to understand it better.
Tip: Experiment with your hands by entering different types of information to see how Excel handles it and works.
Format Your Spreadsheet
Formatting your spreadsheet makes your data clear, professional, and easy to read. Here is a detailed guide:
Highlight cells:
- Click over the cells you want to format.
- Use the toolbar to format (found in the Home menu)
Change font styles:
- Look for the Font group in the Home menu.
- Select a font, make text bold (B), italic (I), or underlined (U).
Add borders:
- In the Font group, click the borders icon (a small square with lines). Choose the type of border you want.
Adjust alignment:
- In the Alignment group, choose how to align text: Left, Center, or Right.
Tip: Explore the toolbar at the top of Excel. You will find many options like Home, Insert, Page Layout, Formulas, Data, etc. Try them one by one to understand how they work, and I will explain them in more detail in a future blog.
Save Your Spreadsheet
- Click on File > Save As.
- Choose a location on your computer.
- Give your file a meaningful name and select the format (e.g.,
.xlsx). - Click Save. (your data will be saved in the location you selected).
Creating a Spreadsheet in Google Sheets
Open Google Sheets
- Step 1: Open your preferred web browser (such as Chrome, Firefox, or Edge) and log in with your Google account.
- Step 2: Copy and paste this link into the browser: https://docs.google.com/spreadsheets/
You will see different templates and options. Click on Blank Spreadsheet.
A blank spreadsheet will open.
Enter Data
- Click on any cell, type your data, and press Enter. Your data will be entered into the cell, and the cursor will move to the next row. To stay in the same row and move to the next cell, use the Right Arrow key or press the Tab key on your keyboard
Format Your Spreadsheet
- Change Fonts and Colors
- Use the toolbar at the top of the screen.
- To change font style, click on font dropdown (e.g., Arial, Times New Roman).
- To change font size, click on font size dropdown.
- To change font color, click on A icon with a color palette.
- To change cell background color, click on paint bucket icon.
Add Borders
- Select the cells where you want to add borders.
- In the toolbar, click the border icon (square with lines) and choose the type of border you need.
Freeze Headers
To keep headers visible while scrolling you need to do this step:-
1. Freeze the First Row
- Go to the View tab.
- Select Freeze and then choose 1 row to freeze the first row.
2. Freeze the First Column
- Go to the View tab again.
- Select Freeze and then choose 1 column to freeze the first column.
Save Your Spreadsheet
Google Sheets automatically saves your work in real-time. You do not need to worry about saving manually- if it takes a little time, it is still being saved automatically.
Find Your File Later
First Option to Find Your Sheet
- You can access your saved file by going to Google Drive.
- Or, type this link in your browser: https://drive.google.com/drive/home
- Once in Google Drive, you can search for your file by name in the search bar or scroll through the list of files to find it manually.
Second Option to Find Your Sheet
- You can also search for your sheet directly in Google Search by typing the exact name of your sheet.
- However, this may not always be the easiest method. It works better if you are worked on or updated your sheet multiple times, as Google will have a better record of it.
Third Option – Save Your Sheet URL
- Another option is to copy your sheet URL link and save it somewhere. The next time you want to find your sheet, simply copy sheet URL link paste the URL into the search bar of your browser. This will open your sheet or file directly.